
An important step in the setup and configuration of the iXpole VIP Desk application is to link the scanning device with your iXpole environment. As this requires certain authorization rights, this step can only be performed by an administrator (someone who has access to iXpole's admin module).
This article will explain how the administrator can create a client for the scanning device in order to link the installed scanning device with the iXpole environment.
Let's get you started!
The following steps have to be taken in order to link a scanning device with your iXpole environment. We start with the context to outline where the normal user is held up in the process of configuring the VIP Desk application.
- Context
- Creating a client
- Creating a QR code to provide to your normal user
- Linking the scanning device with the iXpole environment
- Next step
1. Context
Your normal user has already configured the basic settings of the scanning device and installed the iXpole VIP Desk application successfully. He/she came to the point the application asks for a QR code, to be provided by the administrator:
As administrator, in order to be able to provide such QR code and to further configure the iXpole VIP Desk application and the scanning device, you have to create an API client for this device. As the necessary actions take place in the admin module, a normal user is not authorized to do this. Only after the administrator has provided such QR code, the normal user can continue to configure the scanning device and link it to the event, as the next step in the process of configuring the iXpole VIP Desk application and its scanning device.
2. Creating a client
What we are going to do first, is to set up an API client for the scanning device. This can be done in the
admin module, section API where one clicks on the Add icon on top of the screen:By pressing the
Add icon, a configuration window opens on the right of the screen. In this configuration window, you fill in a name for your scanning device (in the example below, we name it SCANNING DEVICE 1) and in the dropdown-menu, you select "BarcodeScanner". Save this configuration and you have created a client for your scanning device:You have now created a client for your scanning device. As you can see, it appears in the list of configured API's:
3. Creating a QR code to provide to your normal user
Now go back to the admin home screen and click on tab
Access control. In the following screen, make sure the checkboxes Activate VIP Desk and Use VIP Desk 2.0 are checked. Then press the green button below them, Config VIP Desk scanners: If you've clicked on the green button
Config VIP Desk scanners, you enter a screen with QR codes. Look for the one with the name you just gave to your API client. In our case, this was SCANNING DEVICE 1:4. Linking the scanning device with the iXpole environment
This QR code you've just created is the one you should provide to your normal user, in order for him/her to link the scanning device with your iXpole environment. The normal user simply scans the given QR code in order to link his/her scanning device with your iXpole environment (of course, you can do this yourself as well):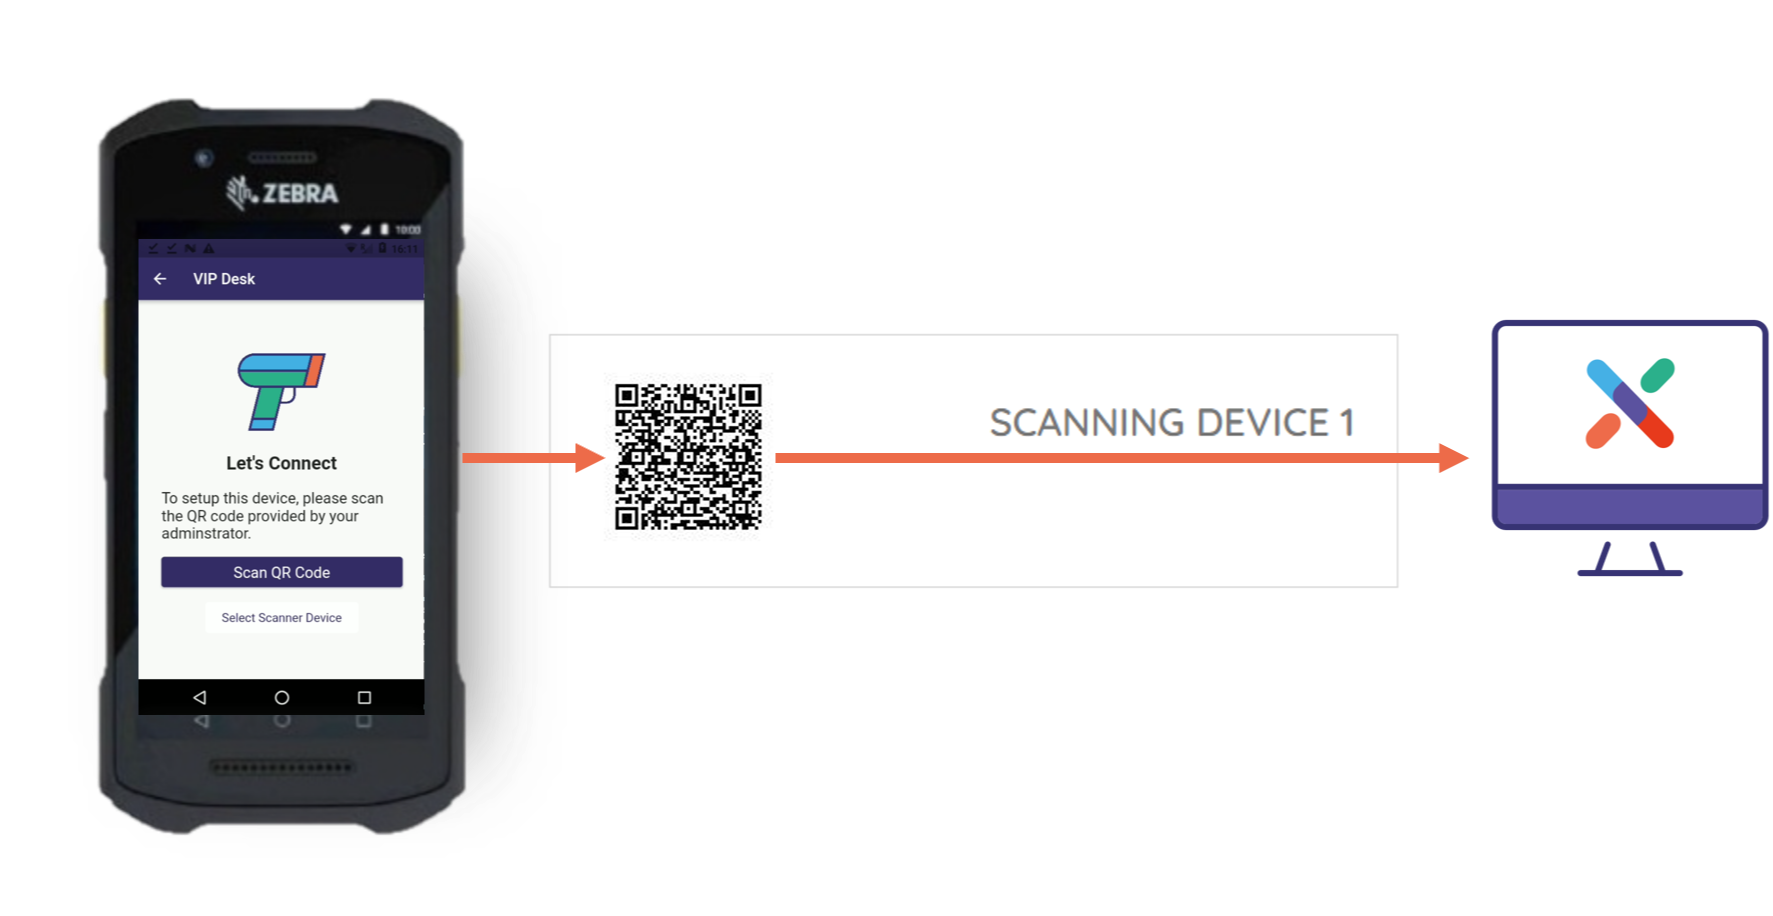
5. Next step
As soon as your device is successfully linked to your iXpole environment (this happens instantly by scanning the QR code) one enters the "Scan your Event" screen, asking to scan another QR code, this time related to the event for which you want to use your scanning device:
If you want to know where you can find the QR code for the event for which you want to use your scanning device for, please read our article "iXpole VIP Desk - Configuring the VIP Desk application and starting to scan". In this article, you can immediately jump to point 4: Scan your Event.