
In the Calendar Item details screen you'll see a list of options on the left side; We call this the Calendar Item configuration menu. This menu is at the core of the configuration of Calendar Items. If you want to correctly configure Calendar Items you need to understand all the components of this list
After reading this article you will understand each of the Calendar Item configuration options and their importance and you will be routed to more detailed configuration information when needed.
Let's get you started
When you click on
Calendar and then on one of the Calendar Items displayed in the overview, the details screen for the selected Calendar Item will open.On the left side of the screen you will see a whole configuration menu divided in 4 different headings.
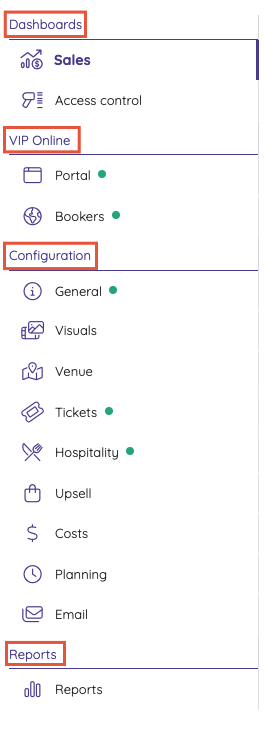
When you click on one of the menu items on the left side, the detailed screen of this configuration option will show on the right side.
1. The Dashboards
There a 2 dashboards
- The Sales Dashboard - gives an overview of sales related to this specific Calendar Item.
- The Access control Dashboard - gives an overview of access control data related to this Calendar Item. There will obviously only be data in this overview when the VIP Desk or an integrated access control solution has been activated.
2. VIP Online
VIP Online is the group name for both iXpole self-service channels: the VIP Portal and the VIP Booker. Depending on which of the self-service channels have been activated for you, this is where you can
- set the configuration of the VIP Portal for this Calendar Item (if you are entitled to using the VIP Portal)
- Manage the VIP Booker(s) for this Calendar Item.
Note that you'll have to complete some of the configuration steps (see below) before you can manage the VIP Online channels here.
3. Configuration
This is obviously the centrepiece of this Calendar Item details screen. This is where you will fine tune the entire configuration of your Calendar Item.
- General - When you click on
General, a screen will be shown that contains the same fields that were configured during the initiation of the Calendar Item. These were described in an article about Match creation and Event creation - Visuals - Per Calendar Item you can configure 5 different visuals. They are all described on the screen when you click on
Visuals. - Venue - When clicking on
Venue, you will be shown a screen where you can first select a Venue Plan for your event. Next you can configure Seats, Parkings, Entrance Flows and a physical address for this Calendar Item. - Tickets - this takes you to the ticket management section for this Calendar Item
- Hospitality - Under
Hospitalityyou can configure all Hospitality settings for this Calendar Item. - Upsell - Under
Upsellyou can add or import Products which can be used for Upsell in relationship to this Calendar Item. - Costs - Under
Costs, you can add different types of Costs that will be added to sales of Products for this Calendar Item - Planning - Under
Planningyou can link different Plannings to this Calendar Item. The creation and configuration of Planning happens in theAdminsection underPlanning. - Email - Under the
Emailstab you can manage and configure all Email settings for this specific Calendar Item
4. Reports
Under the section reports you will be bale to open a couple of event specific and very relevant reports that will help you to better track the operations and performance of each Match or Event.